## Posts In order to add a new post to your site, just create a new file within the `_posts` directory with a suitable file extension, by default that should be `.md` or `.markdown`. Naming conventions are important and so you should make sure to give it a file name with a structure like `YYYY-MM-DD-my-first-post.md`, similar to the example posts you can already tinker with. Jekyll will order your articles by the date included in the file name, so it's required that you choose a file name which follows this convention exactly. ### Front-matter Each file which shall be processed by Jekyll needs to start with so called **front-matter** which provides some kind of configuration to the processor, so it will be able to render each page properly. Essentially, front-matter is written in **YAML** and **starts and ends with three dashes** followed by the posts content itself. {% include media-image.html file="basic-front-matter.jpg" title="Basic front-matter" caption="Example of basic front-matter required by each post and page — everything else is optional" %} - **layout:** The layout will be always `default` so don't think about it too much and feel free to copy and paste it into the front-matter area of each post. - **title:** The title will be **what you can see on top of each page** as well as in the overview on the homepage. - **type:** The type defines the **format of each page** — you can choose between `post`, `page` or `home`, but we'll use `post` for now. Please feel free to **have a look at the existing posts and pages** shipped with this theme in order to get an idea how it works. Now that the configuration has been done, just **write some Markdown** below the second line of dashes, **hit save**, **open up your terminal or console** again and enter `jekyll build` once again to generate the output. ### Useful hint Nobody likes to enter the `jekyll build` command manually all of the time. In fact, `jekyll build` is just the most basic command it offers and let me say it as it is, it's definitely not the most convenient solution. For example, there's an option which watches your folder for changes and automatically builds the new site for you immediately. Once again, please have a closer look at the [Jekyll documentation](http://jekyllrb.com/docs/usage/) for further details. ## Pages In general, *pages work more or less just like posts* — in fact, they even share the same front-matter. The only difference might be the layout, because pages usually don't have next or previous pages and so **there's no teaser at the bottom** obviously and **comments are just available for posts**, but aside from that, they're pretty much identical. In order to create a page instead of a post, please *create a new file in the root of this theme* and add a file extension such as `.html`, `.md` or `.markdown`, depending on your own preference. Considering that it's a static page and not a sequence of posts, **we don't need a date** in its file name anymore and so it could look like this for example: `my-first-page.md` Add just the same front-matter, but instead of setting `type` to `post`, it should be `page` this time. *Rebuild the site once again* via `jekyll build` or a more advanced command and that's it already!

Adding posts and pages

Posts and pages are slightly different in Jekyll, but adding them to your new website should be easy nevertheless. Especially writing contents in Markdown or Textile is a breeze compared to most clunky wysiwyg editors these days.

Published May 8, 2014 in guides
Scroll

Posts

In order to add a new post to your site, just create a new file within the _posts directory with a suitable file extension, by default that should be .md or .markdown.

Naming conventions are important and so you should make sure to give it a file name with a structure like YYYY-MM-DD-my-first-post.md, similar to the example posts you can already tinker with.

Jekyll will order your articles by the date included in the file name, so it’s required that you choose a file name which follows this convention exactly.

Front-matter

Each file which shall be processed by Jekyll needs to start with so called front-matter which provides some kind of configuration to the processor, so it will be able to render each page properly.

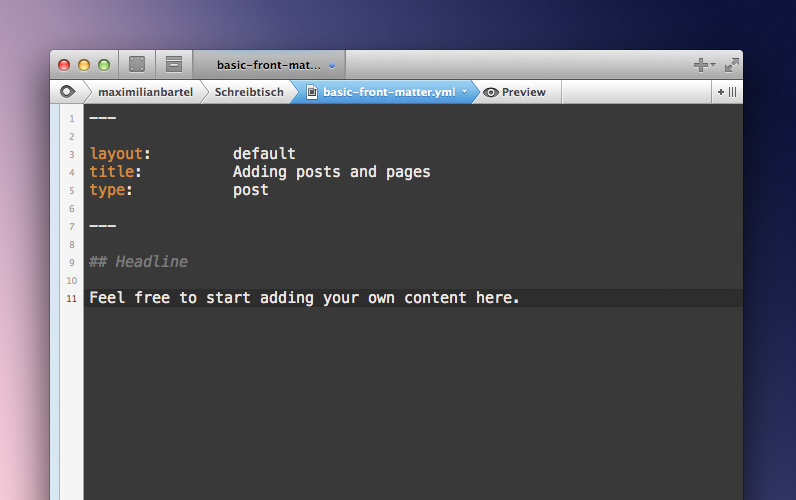
Essentially, front-matter is written in YAML and starts and ends with three dashes followed by the posts content itself.

Basic front-matter

Basic front-matter

Example of basic front-matter required by each post and page — everything else is optional

  • layout: The layout will be always default so don’t think about it too much and feel free to copy and paste it into the front-matter area of each post.
  • title: The title will be what you can see on top of each page as well as in the overview on the homepage.
  • type: The type defines the format of each page — you can choose between post, page or home, but we’ll use post for now.

Please feel free to have a look at the existing posts and pages shipped with this theme in order to get an idea how it works.

Now that the configuration has been done, just write some Markdown below the second line of dashes, hit save, open up your terminal or console again and enter jekyll build once again to generate the output.

Useful hint

Nobody likes to enter the jekyll build command manually all of the time. In fact, jekyll build is just the most basic command it offers and let me say it as it is, it’s definitely not the most convenient solution.

For example, there’s an option which watches your folder for changes and automatically builds the new site for you immediately. Once again, please have a closer look at the Jekyll documentation for further details.

Pages

In general, pages work more or less just like posts — in fact, they even share the same front-matter.

The only difference might be the layout, because pages usually don’t have next or previous pages and so there’s no teaser at the bottom obviously and comments are just available for posts, but aside from that, they’re pretty much identical.

In order to create a page instead of a post, please create a new file in the root of this theme and add a file extension such as .html, .md or .markdown, depending on your own preference.

Considering that it’s a static page and not a sequence of posts, we don’t need a date in its file name anymore and so it could look like this for example: my-first-page.md

Add just the same front-matter, but instead of setting type to post, it should be page this time. Rebuild the site once again via jekyll build or a more advanced command and that’s it already!

First things first: You can use the following shortcodes on every page and in every post as often as you like directly in between of your written contents.

They are most likely the easiest way to enrich your contents with suitable media, you can add captions, descriptions and links to them and they also seamlessly adapt to the screen size of your visitors to avoid breaking the look and feel.

Below I’ll just add a few images, videos and audio files for reference purposes and will try to describe how it works.

Images

Let’s begin with an image which has been already added to the images folder inside the theme directory which is mandatory for this type of media by the way.

Shorcode Preview

Shorcode Preview

This is how each of the shortcodes look like — the ideal image width should be at least 796px by the way

Visit Website

YouTube videos

Next up, a video on YouTube — I really like Jack Johnson’s music and listened to it pretty much all of the time while working on this theme, so why not share a video with you.

You And Your Heart

Just add the video url and the shortcode will do everything else for you

Visit Website

Vimeo videos

Of course it’s also possible to do just the same with Vimeo videos.

Love Snowboarding

All contents automatically adjust their size depending on the visitors screen resolution

Visit Website

Soundcloud music

Adding music from Soundcloud is that easy too.

Great Sound

Quite convenient.. for a static site generator.

Visit Website

Adding media with captions

Adding images, videos and audio files to a website shouldn't be difficult. That's why Hashtag for Jekyll includes some simple short codes which make it easy to add all of that — even better, you can also add captions and links to each one.

Published May 7, 2014 in guides